Thursday, March 29, 2012

5 Things I Would NOT Want to Find in my Attic

5. Dead bodies
I know, I know- that's an obvious one, but really-- any living, dead, or UNDEAD body.  Really ANY body, no matter the degree of decomposition.


4.  Giant Hair Balls
No, not adorable Puss in Boots hairballs...

Like giant, nasty "any-old-cat" hair balls, or like the My Strange Addiction "I eat my own hair" hairballs


3.  A family of gypsies
I don't know how they would all fit up there, but, hey, regardless of their sleeping arrangements, I do NOT want to find them in my attic.

2.  A meth lab
I wouldn't even know a meth lab if I saw one, but I have a feeling it would not be as clean and tidy and picturesque as this wonderful pic, not to mention the potential for explosions and all that face picking!


1. Little Richard
By far the creepiest dude I can think of.   My worst nightmare is to open that attic door and there HE is sitting in the corner at a piano, and starts in on "A-Whop-Bomb-A-Loo-Op, A-Whop-Bam-Boom.... "  **shudders** With those crazy eyes and all that eyeliner.... eek.


Anything in particular that you would not want to find lurking around in your attic???  Let me know!
Happy Thursday!

Wednesday, March 28, 2012

Spring Bling: Robin's Egg Necklace

Spring is in the air, and so is my need for fun, cheap accessories!  Sure you could go out and spend $20, or $30, or $40 on a cute new necklace, or you could pop into your local craft store and spend about ten bucks on supplies and about 10 minutes of your time and make your own!  This Robin's Egg necklace is the perfect Spring accessory. 

Supplies:
One strand of Beads
One yard of Ribbon
Tapestry Needle

(double your beads and ribbon if you want to make both variations of my necklace)


First:  Gather supplies 


Second:  Thread your beads onto the ribbon using the tapestry needle


Third:  Tie a pretty bow and cut the ends at an angle to decrease fraying


And BAM!  Necklace complete! 
P.S. I never said it was the most original idea.  But keep it simple and mix it up with fun Spring colors to make it your own.


If you're feeling really froggy, get yourself a coordinating ribbon (try a yard and a half, to give yourself more length options) and make another.


Dress up a plain white tee with a funky, chunky necklace... or two!


Tuesday, March 27, 2012

Kitchens Smitchens?

I think smitchens is my new favorite word.  Anyway, the next installment of my home makeover is the kitchen.  While I would have done many many many more elaborate things given the budget-- this is what could be done on a shoestring. 

 The breakfast nook before (peeking into the laundry room... but we'll get to that later)
Again with the flesh tones- the previous owners must have bought this ugly paint in bulk... bleh. 
 

You can barely see it, but above the upper cabinets is another set of cabinets which are impossible to reach and not the most functional.... so I had a PLAN!!


Because these upper weirdo cabinets were just so HIGH up I figured if I did store stuff there it would be stuff I never used and never looked at.  In other words- stuff that should have made its way to Good Will already.  So, I thought, "By George, I will rip the cabinet doors off and make them DISPLAY cabinets!!"  Off came the doors and I painted the inside of the cabinets the same color as the walls, had the hubster install cheap and easy under-cabinet lighting and VOILA!  A place to display stuff worth displaying.... ahh the beauty of it all. 


This DIY kitchen makeover cost me less then $50.  About $30 for the lighting and the rest in paint.  All of the items on display were already mine and just hidden behind ugly cabinet doors.


Have I mentioned my intense burning love for IKEA yet?  Probably.... but let me just tell you that IKEA single-handedly allowed the poor Findley newlyweds the ability to still have a beautiful and functional home.  Fo' real.  We have something from IKEA in every room, and one of my favorite buys (next to our entryway makeover- see here) is the awesome railings and racks we hung in our kitchen.  For another $50, we were able to buy all of the hooks and rails and accessories to optimize the usable space in our kitchen.  With limited drawer space-- and I mean severely limited-- we were able to hang our most-used kitchen utensils and our spice rack and our paper towels and our spoon rest AND our measuring cups AND our wine opener AND our....  you see how the list goes on and on. 


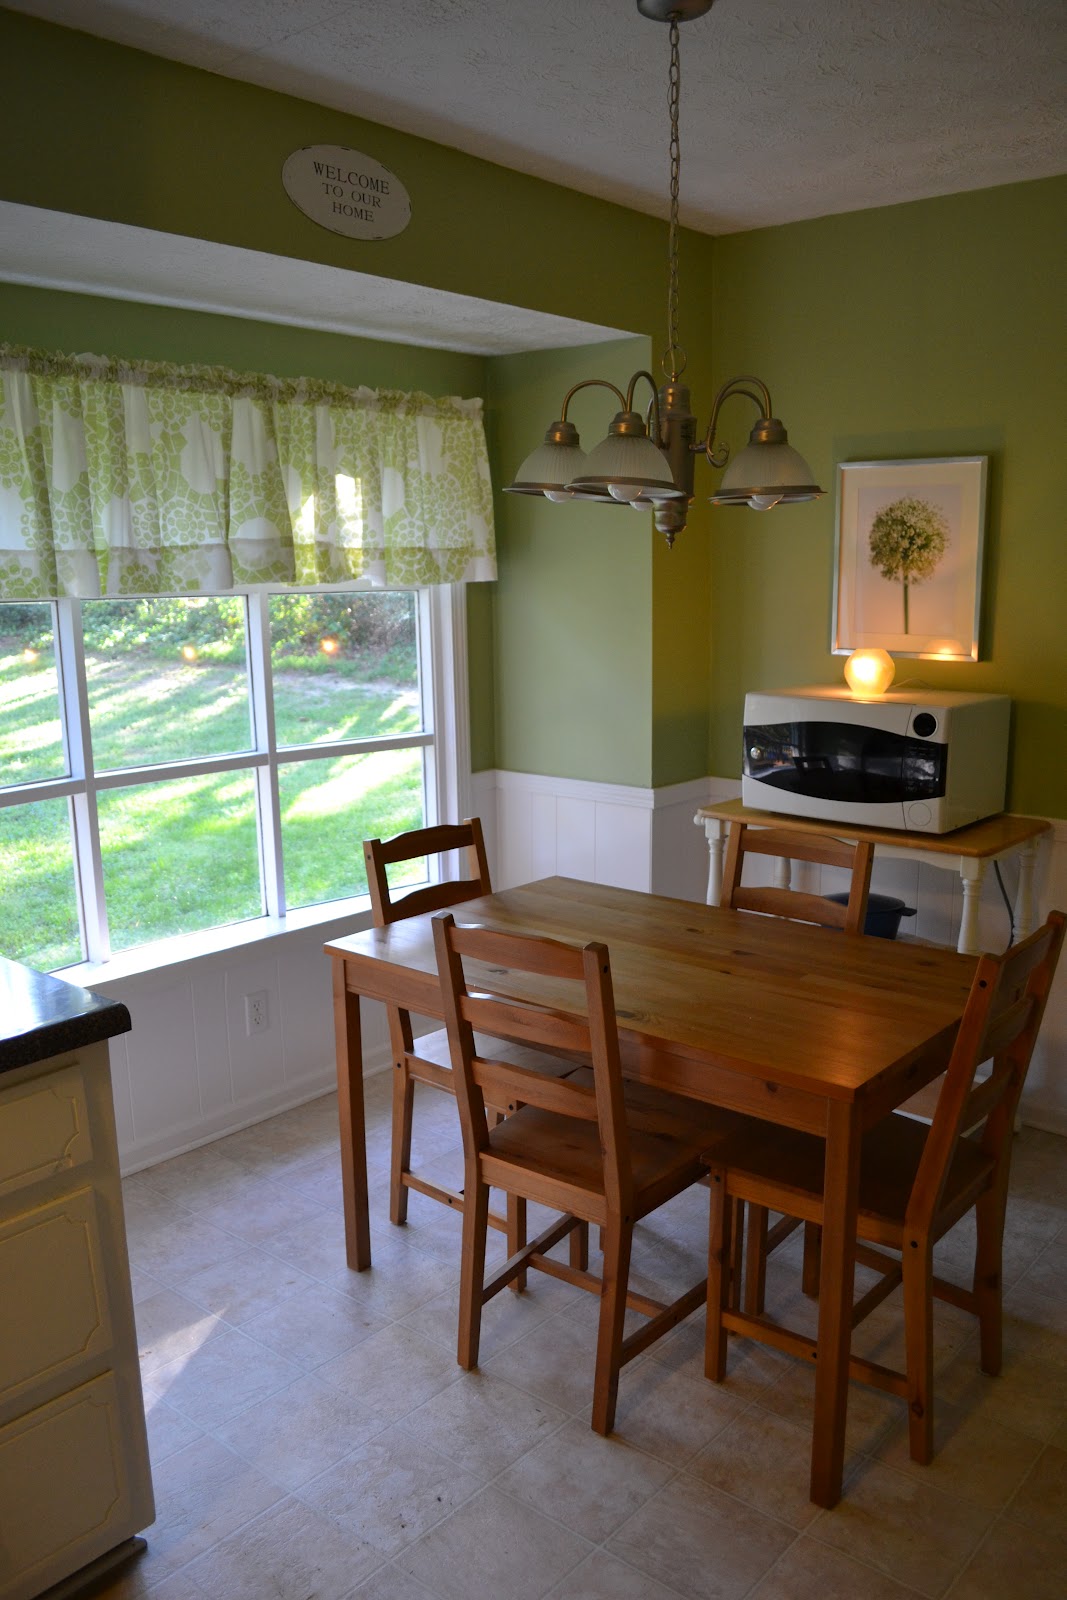
Last but not least on the kitchen tour is the breakfast nook.  Now really, who paints chair-rail molding dusky nude?  These prior inhabitants really made my makeovers more impressive, because ANYTHING is an improvement over what our house looked like before.


We slapped a little white glossy paint on the chair rail and a nice spring green on the walls and it really brightened up the space.


We got the table and chairs from IKEA (of course) for about $70.  Also from IKEA is the artwork and frames and little lampy light on the microwave.  We got the rolling tea cart at a thrift store for about $30.  For a total of about $150.  Not too shabby!


This whole kitchen makeover cost us about $250 including a new kitchen table and chairs-- you can't beat that with a stick!  Have you completed any BIG payoff kitchen makeovers on the cheap? I'd love to hear from you!


Saturday, March 24, 2012

Home Renovation: Before & After

 
When we bought our 1960's ranch four years ago I knew that changes needed to be made.  The previous owners believed wholeheartedly in flesh tone colored walls.  No seriously, they must have been undertakers, because every wall in the house was some hue of pale death.  Not a good look.  Not only that but in the true style of the 60's bungalow, every room was partitioned off, making us feel particularly claustrophobic. With a more open floor plan in mind we knew that some of the walls HAD to go!  Here is a journey through the before and after of our home renovation, enjoy!


This is the house when we bought it, we added the railings and planters to make it more welcoming (as seen in the photo above).


The entry way before...


And after...
 

In the 60's apparently people had just one outfit to live in, and thus did not have the need for closets, or at least not very big ones.  And that left us completely WITHOUT a coat closet.  But with a little help from IKEA, we created a welcoming entryway complete with a hat/coat rack and shoe rack/bench for under $150. 

The hat/coat rack is great to keep our jackets and my purse out of puppy's reach

The magazine rack by the door is also from IKEA- great for organizing mail as we bring it in


This quick and easy DIY project can be completed on the cheap.  All you need is a small framed mirror, some hooks, and the hardware.  Instantly you have a home for your keys, so no searching frantically when you are already running late.  And the added bonus of being able to check your teeth for stragglers before you head out the door.


Part of what bothered us about our house, was this giant wall which separated the front and back of the house when you walked in the door.  The first thing that greeted you was this ghostly white wall which was about 20 feet long.  It left us with these awkward rooms which were not very functional.  The front of the house when you walked in the door was intended to be splint in half into two tiny rooms-- the living and dining rooms.  Then the back of the house had the fireplace and was supposed to be a "keeping" room- whatever that is.  The keeping room was this long and narrow room, which wasn't big enough to be a living room or anything else useful to us.  So that monster of a wall had to go!!  And it did!


View from the entry way before....
 

Why would you want to hide this fireplace? And as you can see, I was getting a little ahead of myself, trying to start the mantle decor prematurely :)
 

View from the entry way after...
 
 As you can see from the above before picture, the fireplace was painted a lovely cyanotic gray-purple.  Reminiscent of an episode of CSI.  My original plan was to paint over that color entirely with the dark brown, but as I gently rolled the paint over the brick I realized that it gave it more depth and personality to leave it two-toned.  So that's what I did... I only gently paint rolled the darker brown color over the surface of the bricks, letting the mortar remain a lighter contrasting color.  Believe me, I was shocked that a color that horrific could look decent at all.


View of the dining room before (well, really, in between)
 

View of the dining room after


View of the living room before
 

Bamboo floors also from IKEA- great value and look awesome!
 

View of the living room after
 

View from the dining room before
 

View from the dining room after
 

I hope you enjoyed browsing our renovation and I hope it inspires you to make some fun changes in your home!